How to edit Microsoft Word documents in Python
August 29, 2021
In preparation for the job market, I started polishing my CV. I try to keep the CV on my website as up-to-date as possible, but many recruiters and companies prefer a single-page neat CV in a Microsoft Word document. I used to always make my CV’s in LaTeX, but it seems Word is often preferred since it’s easier to edit for third parties.
Keeping both a web, Word, and PDF version all up-to-date and easy to edit seemed like an annoying task. I have plenty experience with automatically generating PDF documents using LaTeX and Python, so I figured why should a Word document be any different? Let’s dive into the world of editing Word documents in Python!
Fortunately there is a library for this: python-docx. It can be used to create
Word documents from scratch, but stylizing a document is a bit tricky. Instead,
its real power lies in editing pre-made documents. I went ahead and made a nice
looking CV in Word, and now let’s open this document in python-docx. A Word
document is stored in XML under the hoods, and there can be a complicated tree
structure to a document. However, we can create a document and use the
.paragraphs attribute for a complete list of all the paragraphs in the
document. Let’s take a paragraph, and print it’s text content.
from docx import Document

document = Document("resume.docx")
paragraph = document.paragraphs[0]
print(paragraph.text)
Output
Rik Voorhaar
Turns out the first paragraph contains my name! Editing this text is very easy;
we just need to set a new value to the .text attribute. Let’s do this and safe
the document.
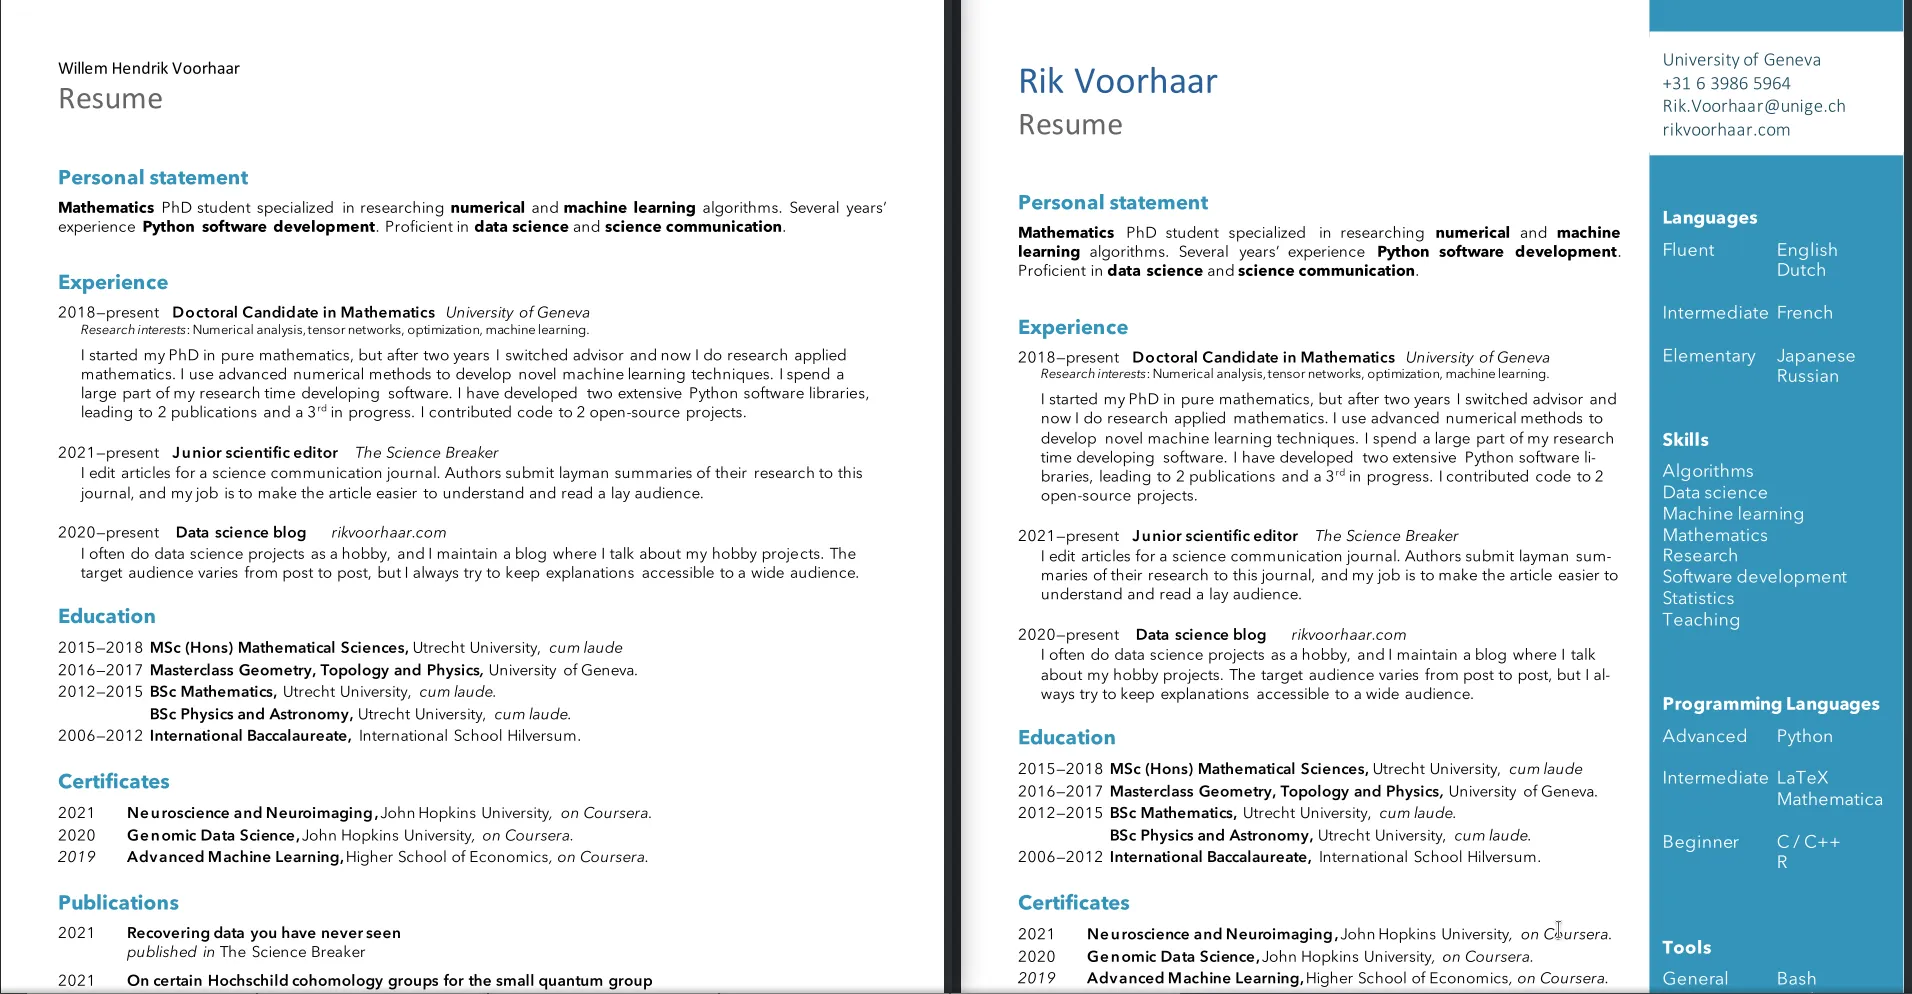
paragraph.text = "Willem Hendrik"
document.save("resume_edited.docx")
Below is a picture of the resulting change; it unfortunately seems like two additional things happened when editing this paragraph: the font of the edited paragraph changed, and the bar / text box on the right-hand side disappeared completely!
This is no good, but to understand what happened to the text box we need to dig into the XML of the document. We can turn the document into an XML file like so:
document = Document("resume.docx")
with open('resume.xml', 'w') as f:
	f.write(document._element.xml)
It seems the problem was that the text box on the right was nested inside an other object, which is apparently not handled properly. This issue was easy to fix by modifying the Word document. However, the right bar on the side consists of 2 text boxes, and the top box with my contact information does disappear if I change the first paragraph. But, it does not disappear if I change the second paragraph; it only happens if I change paragraph 1 or 3 (and the latter is empty). I tried inserting two paragraphs before this particular paragraph, or changing the style of this particular paragraph, but the issue remains.
Looking at the XML the issue is clear: the text box element lies nested inside this paragraph! It turned out to be a bit tricky to avoid this, so for now let us then try changing the second paragraph, changing the word “resume” for “curriculum vitae”.
document = Document("resume.docx")
paragraph = document.paragraphs[1]
print(paragraph.text)
paragraph.text = "Curriculum Vitae"
document.save("CV.docx")
Output
Resume
If we do this there’s no problems with text boxes disappearing, but unfortunately the style of this paragraph is still reset when we do this. Let’s have a look at how the XML changes when we edit this paragraph. Ignoring irrelevant information, before changing it looks like this:
<w:p>
    <w:r>
    <w:t>R</w:t>
    </w:r>
    <w:r>
    <w:t>esume</w:t>
    </w:r>
</w:p>
And afterwards it looks like this:
<w:p>
    <w:r>
    <w:t>Curriculum Vitae</w:t>
    </w:r>
</w:p>
In Word, each paragraph (<p>) is split up in multiple runs (<r>). What we
see here is that originally the paragraph was two runs, and after modifying it,
it became a single run. However, it seems that in both cases the style
information is exactly the same, so I don’t understand why the style changes
after modification. In this case if I retype the word ‘Resume’ in the original
word document, this paragraph become a single run, but still the style changes
after editing, and I still don’t see why this happens when looking at the XML.
Looking at the source code of python-docx I noticed that when we call
paragraph.text = ..., what happens is that the contents of the paragraph get
deleted, and then a new run is added with the desired text. It is not clear to
me at where exactly the style information is stored, but either way there is a
simple workaround to what we’re trying to do: we can simply modify the text of
the first run in the paragraph, rather than clearing the entire paragraph and
adding a new one. This in fact also works for editing the first paragraph,
where before we had problems with disappearing text boxes:
document = Document("resume.docx")
with open('resume.xml', 'w') as f:
	f.write(document._element.xml)

# Change 'Rik Voorhaar' for 'Willem Hendrik Voorhaar'
paragraph = document.paragraphs[0]
run = paragraph.runs[1]
run.text = 'Willem Hendrik Voorhaar'

# Change 'Resume' for 'Curriculum Vitae'
paragraph = document.paragraphs[1]
run = paragraph.runs[0]
run.text = 'Curriculum Vitae'
document.save('CV.docx')
Doing this changes the text, but leaves all the style information the same. Alright, now we now how to edit text. It’s more tricky than one might expect, but it does work!
Dealing with text boxes
Let’s say that next we want to edit the text box on the right-hand side of the document, and add a skill to our list of skills. We’ve been diving into the inner workings of Word documents, so it’s fair to say we know how to use Microsoft Word, so let’s add the skill “Microsoft Word” to the list.
To do this we first want to figure out in which paragraph this information is stored. We can do this by going through all the paragraphs in the document and looking for the text “Skills”.
import re
pattern = re.compile("Skills")
for p in document.paragraphs:
    if pattern.search(p.text):
        print("Found the paragraph!")
        break
else:
    print("Did not find the paragraph :(")
Output
Did not find the paragraph :(
Seems like there is unfortunately no matching paragraph! This is because the
paragraph we want is inside a text box, and modifying text boxes is not supported
in python-docx. This is a known issue, but instead of giving up I decided to
add support for modifying text boxes to python-docx myself! It turned out not to
be too difficult to implement, despite my limited knowledge of both the package
and the inner structure of Word documents.
The first step is understanding how text boxes are encoded in the XML. It turns out that the structure is something like this:
<mc:AlternateContent>
    <mc:Choice Requires="wps">
        <w:drawing>
            <wp:anchor>
                <a:graphics>
                    <a:graphicData>
                        <wps:txbx>
                            <w:txbxContent>
                            ...
                            <w:txbxContent>
                        </wps:txbx>
                    </a:graphicData>
                </a:graphics>
            </wp:anchor>
        </w:drawing>
    </mc:Choice>
    <mc:Fallback>
        <w:pict>
            <v:textbox>
                <w:txbxContent>
                ...
                <w:txbxContent>
            </v:textbox>
        </w:pict>
    </mc:Fallback>
</mc:AlternateContent>
The insides of the two <w:txbxContent> elements are exactly identical. The
information is stored twice probably for legacy reasons. A quick Google reveals
that wps is an XML namespace introduced in Office 2010, and WPS is short for
Word Processing Shape. The textbox is therefore stored twice to maintain
backwards compatibility with older Word versions. Not sure many people still use
Office 2006… Either way, this means that if we want to update the contents of
the textbox, we need to do it in two places.
Next we need to figure out how to manipulate these word objects. My idea is to
create a TextBox class, that is associated to an <mc:AlternateContent>
element, and which ensures that both <w:txbxContent> elements are always
updated at the same time. First we make a class encoding a <w:txbxContent>
element. For this we can build on the BlockItemContainer class already
implemented in python-docx. Mixing in this class gives automatic support for
manipulating paragraphs inside of the container.
class TextBoxContent(BlockItemContainer)Given an <mc:AlternateContent> object, we can access the two <w:txbxContent>
elements using the following XPath specifications:
XPATH_CHOICE = "./mc:Choice/w:drawing/wp:anchor/a:graphic/a:graphicData//wps:txbx/w:txbxContent"
XPATH_FALLBACK = "./mc:Fallback/w:pict//v:textbox/w:txbxContent"
Then making a rudimentary TextBox class is very simple. We base it on the
ElementProxy class in python-docx. This class is meant for storing and
manipulating the children of an XML element.
class TextBox(ElementProxy):
        """Implements texboxes. Requires an `<mc:AlternateContent>` element."""

    def __init__(self, element, parent):
        super(TextBox, self).__init__(element, parent)

        try:
            (tbox1,) = element.xpath(XPATH_CHOICE)
            (tbox2,) = element.xpath(XPATH_FALLBACK)
        except ValueError as err:
            raise ValueError(
                "This element is not a text box; it should contain precisely two \
                    ``<w:txbxContent>`` objects"
            )
        self.tbox1 = TextBoxContent(tbox1, self)
        self.tbox2 = TextBoxContent(tbox2, self)
So far this is just good for storing the text box, we still need some code to
actually manipulate it. It would also be great if we have a way to find all the
text boxes in a document. This is as simple as finding all the
<mc:AlternateContent> elements with precisely two <w:txbxContent> elements.
We can use the following function:
def find_textboxes(element, parent):
    """
    List all text box objects in the document.

    Looks for all ``<mc:AlternateContent>`` elements, and selects those
    which contain a text box.
    """
    alt_cont_elems = element.xpath(".//mc:AlternateContent")
    text_boxes = []
    for elem in alt_cont_elems:
        tbox1 = elem.xpath(XPATH_CHOICE)
        tbox2 = elem.xpath(XPATH_FALLBACK)
        if len(tbox1) == 1 and len(tbox2) == 1:
            text_boxes.append(TextBox(elem, parent))
    return text_boxes
We then update the Document class with a new textboxes attribute:
@property
def textboxes(self):
    """
    List all text box objects in the document.
    """
    return find_textboxes(self._element, self)
Now let’s test this out:
document = Document("resume.docx")
document.textboxes
This gives output:
[<docx.oxml.textbox.TextBox at 0x7faf395c3bc0>,
<docx.oxml.textbox.TextBox at 0x7faf395c3100>]
Now to manipulate the “Skills” section as we initially wanted, we first find the
right paragraph. Since the two <w:txbxContent> objects have the same
paragraphs, we need to find which number of paragraph contains the text, and
in which textbox:
import re
def find_paragraph(pattern):
    for textbox in document.textboxes:
        for i,p in enumerate(textbox.paragraphs):
            if pattern.search(p.text):
                return textbox,i
pattern = re.compile("Skills")
textbox, i = find_paragraph(pattern)
print(textbox.paragraphs[i].text)
Output
Skills
Now to insert a new skill, we need to create a new paragraph with the text
“Microsoft Word”. For this we can find the paragraph right after, and this
paragraphs insert_paragraph_before method with appropriate text and style
information. The paragraph in question is the one containing the word
“Research”. I want to copy the style of this paragraph to the new paragraph, but
for some reason the style information is empty for this paragraph. However, I
know that the style of this paragraph should be the 'Skillsentries', so I can
just use that directly.
style = document.styles['Skillsentries']

pattern = re.compile("Research")
textbox,i = find_paragraph(pattern)

p1 = textbox.tbox1.paragraphs[i]
p2 = textbox.tbox2.paragraphs[i]

for p in (p1,p2):
    p.insert_paragraph_before("Microsoft Word", p.style)
document.save("CV.docx")
When now opening the Word document, we see the item “Microsoft Word” in my list of skills, with the right style and everything. I did cheat a little; I needed to make some additional technical changes to the code for this all to work, but the details are not super important. If you want to use this feature, you can use my fork of python-docx . My solution is still a little hacky, so I don’t think it will be added to the main repository, but it does work fine for my purposes.
Conclusion
In summary, we can use Python to edit word documents. However the
python-docx package is not fully mature, and using it for editing
highly-stylized word documents is a bit painful (but possible!). It is however
quite easy to extend with new functionality, in case you do need to do this. On
the other hand, there is quite extensive functionality in Visual Basic to edit
word documents, and the whole Word API is built around Visual Basic.
While I now have all the tools available to automatically update my CV using Python, I will actually refrain from doing it. It is a lot of work to set up properly, and needs active maintenance ever time I would want to change the styling of my CV. Probably it’s a better idea to just manually edit it every time I need to. Automatization isn’t always worth it. But I wouldn’t be surprised if this new found skill will be useful at some point in the future for me.
Keep reading
29th of March, 2022
Linear least-squares system pop up everywhere, and there are many fast way to solve them. We'll be looking at one such way: GMRES.
10th of March, 2022
We recently made a paper about supervised machine learning using tensors, here's the gist of how this works.
26th of September, 2021
A lot of data is naturally of 'low rank'. I will explain what this means, and how to exploit this fact.

15th of January, 2025
I made an array programming language as a language extension to Rust

1st of August, 2024
Self-hosting your own cloud services not only saves money, it is also a great way to learn

7th of October, 2023
In my first dive into Rust, I implemented an unscented Kalman filter in and made it 20x faster than the equivalent Python implementation.

1st of May, 2023
I made an interactive dashboard for this website, and here is the story of how I did it.

26th of February, 2023
Read this blog post if you're curious what I worked on during my PhD!

31st of May, 2021
Finally, let's look at how we can automatically sharpen images, without knowing how they were blurred in the first place.

2nd of May, 2021
Deconvolving and sharpening images is actually pretty tricky. Let's have a look at some more advanced methods for deconvolution.

9th of April, 2021
In order to automatically sharpen images, we need to first understand how a computer can judge how 'natural' an image looks.

13th of March, 2021
Deconvolution is one of the cornerstones of image processing. Let's take a look at how it works.

13th of February, 2021
I have 15 years worth of email traffic data, let's take a closer look and discover some fascinating patterns.

9th of November, 2020
We use exams to determine how much a student knows, but exams aren't perfect. How can we estimate the uncertainty in students' exams scores?

26th of August, 2020
Cross validation is extremely important, but how should we choose the size of our validation and test sets?

12th of August, 2020
I use last.fm to track my music listening. Let's look at my data to discover how my musical preferences evolve over time.
10th of August, 2020
Normally distributed data is great, but how do you know whether your data is normally distributed?

20th of June, 2020
Judging in figure skating is biased. Let's use data science to figure out just how bad the issue is.